Introduction
As previously mentioned in my logo design post, I mentioned that I will be animating my logo. The animation simply consists of the letter 'E' on 'Stage' simple flickering as if the light bulb is breaking. So, I started to research into Adobe After Effects (the software I'll be using for this to happen) to see how this animation can happen.
How to Make Flickering Lights in After Effects (from YouTube): https://www.youtube.com/watch?v=as3yfEueHb4
As well as help from Ferg, this is the video which I watched to help make my animation proceed. Below are the steps that I followed:
After opening the layer onto After Effects, I firstly had to make the layer 3D due to the spotlight effect needing to be 3D. After this, I simply created a layer which was called 'lens flare', that allowed me to change the type of light option which you can see below:
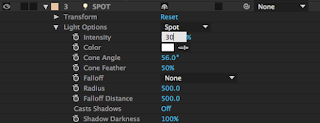
I then changed the light type to 'spot'. This is because for this flicker to happen it must only effect a certain area of the logo, so in this case around the 'E' so it looks like the stage light above the 'E' is flickering. I named the layer 'SPOTLIGHT'.
I then made sure that the background was transparent like it says to do on the video. This makes it easier to see the effects of the light by having a transparent background.
Now that the background is transparent and the spotlight effect is on, I now had to alter the spotlight so the spotlight comes from the stage light. This can be seen below - After Effects lets you alter the size, angles and positioning of the spotlight by viewing it in 4 different viewing methods, because the layer is now 3D.
Once the spotlight was put into position, I then created another new composition which was now an ambient light, which you can see below. This enables the whole logo to maintain it's normal colour and lighting and to enable me to let this flicker happen on the 'E', because at the moment the flickering was back to front (it would flicker from dark to light).
This now made the flicker go from light to dark instead of the other way, as you can see below.
Now that the spotlight was in position, the ambient light is in place, I now needed to make the flickering animate. This is simply done by creating key frames by altering the intensity of the spotlight. So, I began to alter the intensity of the light to see which intensity was most suited, before keeping it at 30% as this seemed to be the best.

I then created another key frame to change the intensity to 0%. This was done 3 times at different paces so that we see the light flicker 3 times in one stint. The reasons why I made the pace different for each flicker is so that it seems more realistic - when lights flicker they tend to flicker at a random pace instead of a steady one.
Below is a draft of the title sequence that shows the flickering take place at the end. To me, this video and Ferg's help were very beneficial as I managed to get a simple yet effective animation for our title sequence.
Title Sequence 1st Draft


0 comments:
Post a Comment